Database Practical 3 Queries
- David Briffa
- Nov 13, 2022
- 4 min read
Updated: Dec 27, 2022
Let us now delve into concepts that were covered Chapter 34. This time we will be looking at queries, why we need them, and how we get valuable information from our database.
Re-setting the Scene

Munchies.accdb has four tables to store data about Tables, Tablets, Zones and Attendants. The database organises basic information about the restaurant layout and the servers so that patrons can order in their own time by making use of a digital menu on a tablet. It is highly recommended to refer to Chapter 33 which explains the scenario in detail.
Your Tutorial Starts Here
Step 1 Open Munchies.accdb in Microsoft Access
The database is available for download so that you can have a local copy on your machine.

Now, open it using Microsoft Access. You should remember how to do this from last time, however, we have copied the instructions hereunder just in case you need more support.

To open Microsoft Access, press the Windows Key and search for "Access".
From the toolbar at the top, navigate to File > Open, and browse to the file you just downloaded. It will most likely be in the Downloads folder.
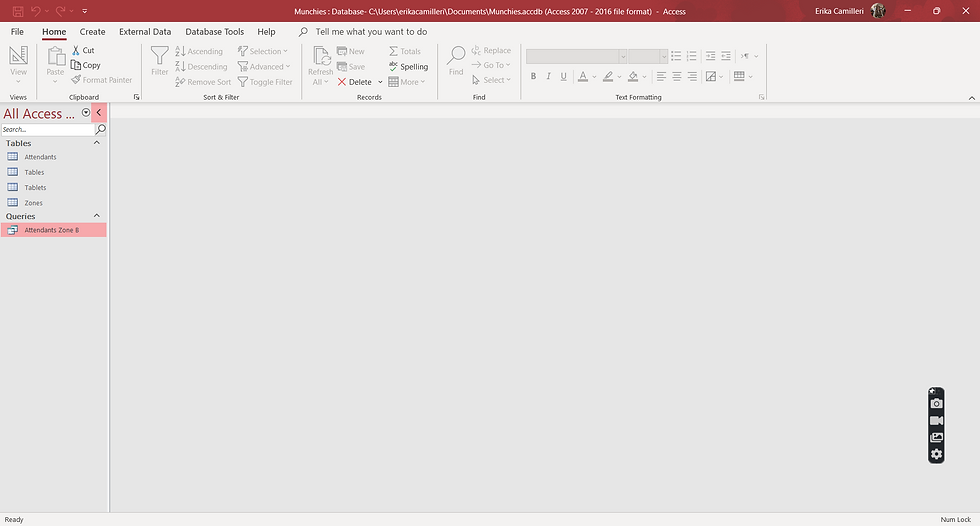
When you select on Munchies.accdb and click on Open you should get the view as depicted by the screenshot on the right.
Step 2 Open an existing Query
We start by opening a query that is already defined in the Munchies database, in the Objects menu on the left, under Queries. The query is named "Attendants Zone B". Similar to how we worked with tables, there is a Datasheet View and a Design View. When you double-click on the query, it automatically opens in Datasheet View.

Step 3 Getting Results
We can get query results by running the query. While in Design View, use the Query Design ribbon to run the query by pressing on the Run button.

You'll notice you get empty results. But, why is this?

Switch to Design View and look at the query by example which is doing a number of things:
Field Full Name is marked as a field to be returned since the Show is ticked (✓).
Field Zone is being used to Filter on ones that have zone "B".
Open the Attendants Table by double-clicking on it and see what it should be returning.

Did you notice there are no rows with Zone B? This explains why our query is not returning any data. Therefore, it is working correctly!
Step 3 More Query Options
Using query Design View, which we refer to as query-by-example, we can select, filter, and order our return data in a number of ways:
Select This part indicates the fields that contain the data we are interested in the most for our query. If we want certain data fields to be returned back, or displayed in the end-result then we tick must tick (✓) the Show tick box.
Data Filtering Criteria We use the Criteria section to set a data filter on a particular field that is selected.
Order Results Records returned in the result may be ordered in a particular way by specifying 'Ascending' or 'Descending' in the Sort section on a particular field that is selected.
Step 4 Create a New Query-by-Example
Now it is time to create a query-by-example from scratch.
Click on Create in the function ribbon on top and select Query Design.

This action will open a tab that display an empty query-by-example as depicted in the screenshot below.

Add Tables

First, we need to add the tables that will be part of our query-by-example. In
this example we are going to add two
tables that have a relationship: Attendants and Zones.
On the right side of your screen, you should see two right hand panels. The one which is furthest on the right is of most interest which has the heading: Add Tables. From this panel you need to click on Attendants and Zones and 'Add Selected Tables'.
Your tables are now ready to start building your query-by-example as in Steps 2 and 3. Save (Ctrl + S) and give it a name e.g., "Attendants Zone C".

Check Your Results

Switch to Datasheet View in order to compare the below with the records that got returned in your results.
Number | Full Name | ID No | Location |
3 | Janice Borg | 118239M | Outside |
2 | Sergio Muscat | 82392M | Outside |
Step 5 Simulating Results
Being able to debug and troubleshoot without using a computer is surprisingly still a very important skill. With databases, it is no different and you should mentally visualise results of the query-by-examples you design without the need to access a computer. We normally do this by having a very small sample of table data on paper and mentally working out what records will be filtered out. You need to remember how selection, filtering and sorting works!
Step 6 Give Yourself a Pat on the Back!
And that is it! Well done for completing three chapters and three practical sessions where you gained practical experience on: setting up tables, defining relationships, data inputting, and configuring a query-by-example to fetch particular data.


Comments