Tinker At Home 1: Morse Code Secret Message
- Erika Camilleri
- Oct 15, 2024
- 3 min read
Your journey of low level computer electronics starts here. What an exciting time to be learning computer science! Let's learn and have fun.

What is an Arduino board?
Arduino is a microcontroller development board. To explain, the printed-circuit board (PCB) houses a low power computer system consisting of a CPU, memory, and programmable I/O peripherals e.g., pins and LED lights.
Over the years, Arduino has released over 100 hardware products: boards, shields, carriers, kits and other accessories making it popular amongst engineering students at university and professional engineers that want to get into robotics.

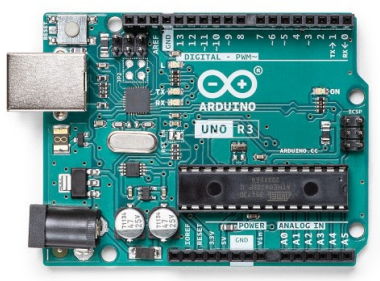
The simplest board to look at is the Arduino UNO R3 board powered by an ATmega328P microcontroller. The board has everything needed to support the microcontroller, including 1KB of EEPROM which we will soon learn is non-volatile memory.
A programmer or an engineer can connect the board to a computer using a USB. This board also comes with technical documentation which we will touch on in other lessons. Such boards offer a good opportunity to get into electronics and coding. Moreover, you get experience the fundamental principles of computer science.
Popular boards on the market
Arduino UNO R3 board powered by an ATmega328P microcontroller. 🏆
Teensy 4.0 board which features an ARM Cortex-M7 microcontroller. 🥈
ESP32-S2 SoC powered by a 240MHz single core processor. 🥉
Raspberry Pi 4.0 boasting a powerful Broadcom BCM2711 SoC.
You Should Remember From Lessons...
Programming an Arduino on Tinkercad is easy and fun! We have completed Section 1: Introduction of the course, so now it is time to practice at home.
Use the Blocks + Text Code View
The code that you are constructing using blocks is converted into C++ which is important for you to learn. A few points to keep in mind:
We use the C++ setup to initialise our board and let it know what input and output components we will be using. In this exercise we will program the built-in LED like we learned in class. Note that both the blocks, and the text make reference to this LED.
We use the C++ loop to control the components. In the example below, we command the built-in LED to turn on, by setting it to HIGH, and turn off by setting it to LOW. In C++ we use digitalWrite to set these values.
We use the C++ delay to pause the program between digitalWrite commands. The effect is a flashing LED which is what we want!
Exercise: Hello World In Morse Code
It is traditional to write a Hello World program to get acquainted with a new programming language and that is what we will do as an exercise. We are going to write a simple program that outputs "hello world". We do have one problem... how are we going to output our message?
We need some form of output component so that we can see the message. An output component is any piece of hardware that converts digital information in a way us humans can understand e.g., text, sound and.... lights!
We can use the built-in LED to output our message in Morse code whereby a dot means the LED needs to light up and a dash means the LED is off for a while. The forward slash /, indicates that we need the pause for a little bit longer to indicate the end of a word.
Hello world in Morse code:
.... . .-.. .-.. --- / .-- --- .-. .-.. -.
You will find a tinker under Activities to help you get started quickly:
When you open the tinker, this is what you should find:
Homework Tips
The flashes within the same letter signal are very short, so we use milliseconds to wait. Note that for every "." we are waiting 75 milliseconds between HIGH and LOW.
After each letter, meaning a /, we are waiting a bit longer to indicate the end of a letter, so we are waiting for 1 second.
We do have a model answer for you to refer to, but there is a catch... you cannot Copy+Paste. Oh, and the full answer we provide is in C++ so you have to do the translation to blocks yourselves!


Comments